Recently I have put aside my card making to pick up my brushes and start painting again. I’ve been inspired by Kelly Rae Roberts and the journal style of Teesha Moore who I just recently discovered. On her site she has a great tutorial for making a handmade art journal with great instructions and images. I’ve always wanted to take a book making class and I’ve attempted handmade books in the past with varying degrees of success but this tutorial looked like something I could do. Whenever I find something new I want to try (like a sewing project) I tend to scan through the pics and instructions and think yeah, I can do that but I don’t need to follow step by step instructions 🙂 This may be why my sewing projects don’t turn out like they should! Anyway, I liked the idea of the string binding with the stings coming though the spine (this has technique a name?) and I liked using watercolor paper since I have a lot. I didn’t have some of the other items so I thought I’d start with the string binding and see how it evolved. I used one large watercolor paper sheet that I just ripped until I got a size I wanted, I ended up with 8 pieces.
My instructions are very loosely based on Teesha’s and a few other sites I found online. I make no claims that these are the most original or best instructions out there. And I admit it’s pretty red-neck to use masking tape but hey, I was out of duct tape!
Here’s the supplies:
-Watercolor paper 11 x 7.5 in, folded in half
-Foam core board: 2 pieces 7.5 x 5.5, and one piece 1/2 x 7.5 in (or any other stiff material, this is what I had)
-masking tape
-liquid adhesive, I used a bottle of PVA bookbinding glue that was a gift from a friend (gotta love a gift like that!)
-scrapbook, wrapping, or other paper for cover
-hole punch
-binder clips
-embroidery thread
-ruler
-x-acto knife
-ribbon and other favorite embellishments
Steps:
1) rip or cut interior pages to size, fold in half
2) space our 5 holes with a pencil, hold with clips and punch holes in folded pages

3) Measure and cut w/knife and ruler foam core board pieces

4) Lay foam core pieces together with small space in between each space. Next tape pieces together.

5) cut a strip of paper 1.5 x 8.5 glue strip to outer spine, wrapping around the inside
6) cut cover pieces, glue to front and back covers, and inside if you want.
7) cut a 1/2 in strip to cover the tape of the inside spine
Now to assemble pages:
-disclaimer, I tried Teesha’s instructions and looked at a few other sites, sort of followed, but kind of made up my own technique based very loosely on a blanket stitch. I also learned that a “signature” is a bundle of a few pages that are bound together before being bound into the whole book.
1) place two folded pages together with the holes lined up, start a blanket stitch, leaving a long tail if you don’t it’s a pain to fix it later, trust me
2) continue to stitch pages together, tie off a knot at the end and leave a a long tail

3) punch two small holes in the top and bottom of the book spine
4) stack all the pages, take half of the strings though one hole, and then the other. Tie off in a knot on outside of book. Repeat for other end. Here you could add some beads or something.

Now finish embellishing your cover.
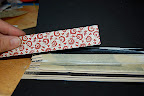
Here’s my finished journal.

I used a printed collage sheet (by Rusty Pickle) that I’ve held onto for a few years, I added a strip of “wish” tickets, a saying printed on vellum, a book plate with the word passion, a metal photo turn type thing used to close my journal with ribbon, and a wire heart that I made.
I admit it’s pretty rough, and not the prettiest thing I’ve made, but I’m pretty happy with it. Now if only I could get inspired enough to use it!
Thanks for looking!


